De-Haze [Project]
Ever wondered how to restore clarity to hazy images? In this blog, we'll explore a Python implementation of a dehazing algorithm using U-Net and Pix2Pix architectures, with the code available on GitHub.
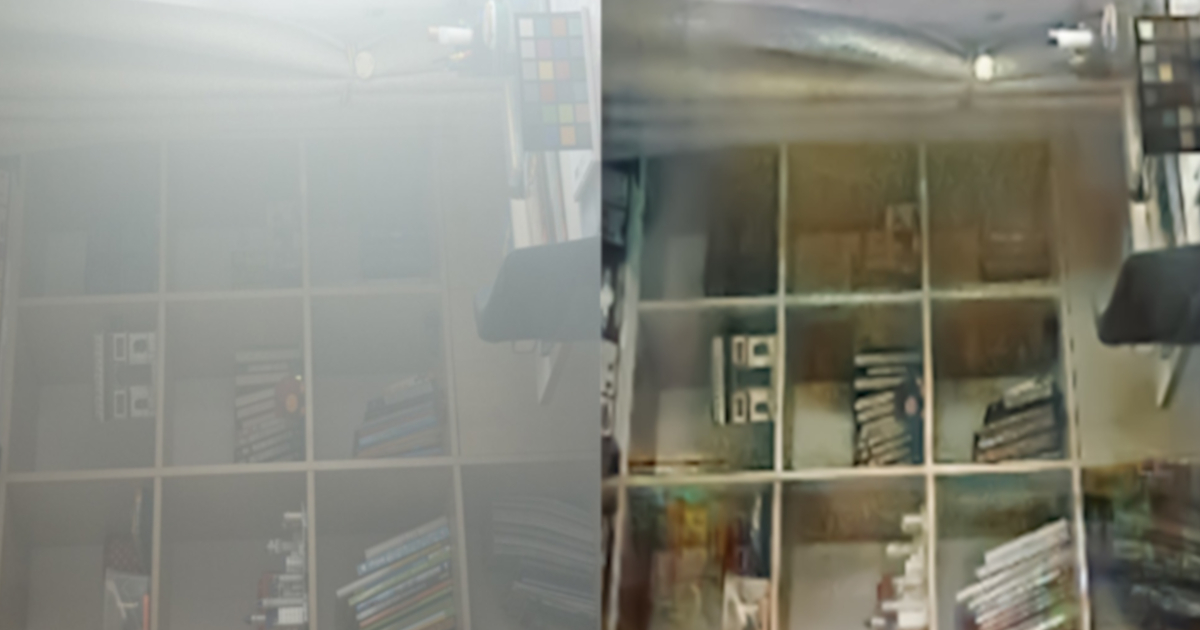
Image Dehazing Project
In this project, I developed a deep learning-based solution to improve the quality of hazy images using both U-Net and Pix2Pix architectures. The core part of the project is based on OpenCV and TensorFlow for image processing and deep learning model training.
The code is available on GitHub: De-Haze.
Getting Started
Follow these steps to set up and run the project:
-
Clone this repository to your local machine:
1
 git clone https://github.com/paulrounak/De-Haze.git
-
Navigate to the project directory and install the required dependencies:
1
 pip install -r requirements.txt
-
Make sure your environment variables are set correctly for running TensorFlow with GPU support, such as
CUDA_PATHandLD_LIBRARY_PATH. Ensure that your system meets the requirements for TensorFlow GPU usage.
Image Preprocessing: Enhancing Visual Clarity
Image preprocessing is a crucial step in the dehazing pipeline. In this project, I used a combination of Contrast Limited Adaptive Histogram Equalization (CLAHE) and adjustments in the HLS color space to enhance the clarity and color of hazy images.
Increasing Contrast with CLAHE
CLAHE is applied to the luminance channel in the LAB color space. It helps to:
- Improve local contrast in areas affected by haze.
-
Highlight hidden details that are otherwise washed out by the hazy environment.
1
2
3
4
5
6
  lab = cv2.cvtColor(frame, cv2.COLOR_BGR2LAB)
  l, a, b = cv2.split(lab)
  clahe = cv2.createCLAHE(clipLimit=5.0, tileGridSize=(3, 3))
  cl = clahe.apply(l)
  limg = cv2.merge((cl, a, b))
  dehazed_frame = cv2.cvtColor(limg, cv2.COLOR_LAB2BGR)
Adjusting Lightness (L) and Saturation (S) in the HLS Color Space
After increasing contrast with CLAHE, I converted the image to the HLS color space for additional enhancements:
- Lightness (L): Reducing
Lminimizes the haze’s bright, washed-out effect, revealing details obscured underneath. - Saturation (S): Increasing
Samplifies the vibrancy of the image, bringing out the natural hues hidden by the haze.
Together, these adjustments enhance the underlying colors while retaining a balanced look, resulting in a clearer and more vibrant image.
1
2
3
4
5
6
7
8
9
10
11
hls = cv2.cvtColor(dehazed_frame, cv2.COLOR_BGR2HLS)
h, l, s = cv2.split(hls)

# Reduce the lightness to minimize haze brightness
l = cv2.subtract(l, 40)

# Increase saturation to amplify colors
s = cv2.add(s, 30)

hls = cv2.merge((h, l, s))
final_frame = cv2.cvtColor(hls, cv2.COLOR_HLS2BGR)
This preprocessing pipeline ensures the images fed into the deep learning model have enhanced contrast, reduced haze, and restored colors, providing a strong foundation for training and predictions.
Deep Learning Models
U-Net Model
The U-Net architecture is primarily used for image segmentation and restoration tasks. In this project, the U-Net was employed to learn the relationship between hazy and clear images to enhance image clarity.
1
2
3
4
5
6
7
8
9
10
11
12
13
14
def unet(input_shape):
    inputs = Input(shape=input_shape)

    # Encoder
    conv1 = Conv2D(64, (3, 3), activation='relu', padding='same')(inputs)
    conv1 = Conv2D(64, (3, 3), activation='relu', padding='same')(conv1)
    pool1 = MaxPooling2D(pool_size=(2, 2))(conv1)

    # Further layers for deeper encoding and decoding

    outputs = Conv2D(3, (1, 1), activation='sigmoid')(conv9)

    model = Model(inputs=[inputs], outputs=[outputs])
    return model
Pix2Pix Model
The Pix2Pix architecture, a conditional GAN (Generative Adversarial Network), was also used to tackle the image-to-image translation problem. This model is ideal for tasks like dehazing, where the goal is to learn a mapping from hazy images to clear images.
1
2
3
4
5
6
7
8
9
10
11
def pix2pix(input_shape):
    inputs = Input(shape=input_shape)

    # Generator network (image translation)
    conv1 = Conv2D(64, (3, 3), activation='relu', padding='same')(inputs)
    conv1 = Conv2D(64, (3, 3), activation='relu', padding='same')(conv1)

    # Further layers for generator and discriminator

    model = Model(inputs=[inputs], outputs=[outputs])
    return model
Training the Models
Both U-Net and Pix2Pix models are trained using a dataset of hazy and corresponding clear images. The models use a loss function that minimizes the difference between the predicted and actual clear images. Here, the Mean Squared Error (MSE) loss function is used.
The model creates better and clearer images as the dataset grows and undergoes more training. Try changing the number of epochs or the dataset size to see how the model improves.
1
2
3
4
5
def train_model(X_train, X_val, y_train, y_val, input_shape, output_dir, num_epochs=60, batch_size=3, model_name='my_Model.h5'):
    model = unet(input_shape)  # Or pix2pix(input_shape) depending on the model
    model.compile(optimizer='adam', loss='mse', metrics=['accuracy'])
    model.fit(X_train, y_train, validation_data=(X_val, y_val), epochs=num_epochs, batch_size=batch_size)
    model.save(os.path.join(output_dir, model_name))
Results and Visualization
Once trained, the models can be used to predict and dehaze images or video streams. The output is then visualized using OpenCV.
1
2
3
4
5
6
7
8
9
def predict_and_visualize(model, img):
    img = cv2.resize(img, (256, 256))
    img = preprocess(img)
    img = img.astype(np.float32) / 255.0
    prediction = model.predict(np.expand_dims(img, axis=0))[0]

    cv2.imshow('Prediction', prediction)
    cv2.waitKey(0)
    cv2.destroyAllWindows()
Conclusion
This project demonstrates how to apply both U-Net and Pix2Pix architectures to remove haze from images and videos, enhancing their quality. By combining image preprocessing, deep learning models, and TensorFlow, I was able to create an effective solution for real-world hazy image correction. This can be applied in fields like satellite imagery, outdoor photography, and surveillance.
A further improvement to the de-hazed image could involve using noise-reduction models and sharpening tools to enhance it even more.
Feel free to clone the repository and experiment with the code. Happy coding!